xTV Production System
Douglas Crockford
Matthew Alan Kane
David Lawrence
Lucasfilm Ltd.
April 19, 1987
xTV is a new educational product which uses computer, video, and optical technology in group presentation and participation.
xTV has some peculiar production requirements which are best met with a specialized production system. This system will greatly simplify the task of editing concise video "segments", as well as manage the complexity of creating a videodisc and CD-ROM that work together.
The capabilities we require include:
Database construction. There are two databases involved, one being used in the construction of the other.
The first is the Production database. It will contain information on each of the pieces of image material (stills, film, videotape). It is critical to catalog the images properly, because there will be thousands of them, and many of them will be covered by some sort of license or royalty arrangement. We will need correct information on what each image is, and how it is to be used. We will also need access tools so that a producer can easily locate that needle in the haystack of images.
The other database is the Product database. This is the one which will be pressed onto a CD-ROM. In addition to all of the information that goes into that database (some editorial, some data, some compressed sound and image), index generation will need to be performed. (Performance of CD-ROM is so abysmal that the only hope of achieving tolerable search times is to assemble extensive indexes.)
Videodisc management. In addition to cataloging all of the images, they must be correctly transferred to a pre-master tape in the correct sequence. This can require tens of thousands of edits, and every one must be correct. An off-by-one error can render a disc useless.
Digital audio. Most of the soundtracks in an xTV product will be stored on CD-ROM in a compressed digital form. During production, we will need to be able to digitize, compress, and store a soundtrack in the production database.
Segment production. The process of efficiently synchronizing images to sounds requires a special editing capability.
Prototyping. During production it will be necessary to preview the segments for testing and review purposes. It will also be necessary to test the material in an xTV Workshop environment prior to the mastering of the CD-ROM and videodisc.
Production Overview
An xTV Production will use tens of thousands of still and moving images. As images are located and collected, they will be transferred to 1" videotape, from which working videodiscs will be made. Cheap computer graphics (including overlays and animations) is another image source.
The images need to be synchronized with the soundtrack. The Econodroid operator will be shown a graphic representation of the soundtrack. The visible soundtrack will be the timeline for the segment. The producer then identifies the places on the timeline where the images will occur. Audio can be played back, with visible indications of time passage. By using ears and the visible soundtrack, the operator can easily locate speeches and musical beats, and attach images to them. The placement of images in time can easily be adjusted. Images can be inserted, deleted, and rearranged. A segment can be saved for later refinement.
Sequencing of images in time can also be done without a soundtrack, permitting the recording of a soundtrack to fit the pictures. Editing can also be done to an scratch soundtrack, in which someone reads the narration directly into the system, in order to get a sense of how the segment will work before going to the expense of producing a professional soundtrack.
The result of this process is a playlist for a segment, mapping the sequencing of events to time. A playlist is a command language that the xTV Workshop uses to put on its presentations.
When all segment production and database construction activities are complete, then optical discs for the product can be made. The Production system will create the editing commands for deleting the unused images and putting the used images in the correct physical order. It will also translate the database into a High Sierra, CD-ROM format.
System hardware
The xTV Production System is a machine (or set of machines) which will facilitate the production of an xTV Product. The hardware will include
• A Macintosh II with 16Mbytes, a standard color board, a and monitor.
• An NTSC frame grabber/buffer and video monitor.
• 2 or more videodisc players.
• An Apple IIGS for testing and cheap computer graphics.
• An enormous disk drive (for CD-ROM emulation) with a capacity of a gigabyte. Efficient operation requires twice the capacity of CD-ROM.
• A magnetic tape drive (for backup purposes, and for creating pre-master tapes).
• A digital audio processor (with D-to-A and A-to-D).
• A cheap VCR for recording prototype segments.
Many of the production tasks (such programming and database updating) can happen on additional Macintoshes.
Programs
The xTV Production System software will be composed of three major programs:
Database
Econodroid TM
Pre-Pre-Mastering
Other off-the-shelf tools will include word processors, paint programs, compilers, assemblers, etc.
Database
The xTV Production System will contain a database management system. Products under consideration are Omnis 3 Plus and dBASE Mac.
Database Requirements
The database system will need to meet these requirements:
• It should have the ability to link files, using a relational or network database model.
• It should support files containing 100,000 records or more.
• It should permit the use of the database by distant production sites, by permitting the periodic exchange of update files.
• It should have report generation capabilities. Required reports include Image License Fees By Segment, and Image License Fees By Owner.
• It should have an access layer that allows the database to be examined and updated by our computer programs.
Use of the Database
The database has several uses for the production. It will contain production oriented information, which is used to manage the production, and product oriented information, which will ultimately appear in the xTV Product Database.
The database will be used to organize the enormous image collection, to associate with each image a reference number, a frame number, a description, and an owner and fee policy. The database will also associate with each segment the images used in that segment.
Some of the database manipulation will be done using the database program. Other manipulation will be done via the Econodroid and the Pre-Pre-Mastering System.
The other use of the database is to collect data for the product database. The product database will include information of each of the segments, including retrieval tools and teacher support materials.
The database system will be extended by the Macintosh's HFS. Large objects (such as scripts, playlists, and digital soundtracks) will be stored in a folder named for the object containing the fields.
Econodroid
"It's not cheap, but it is economical!"
Econodroid is a program for making segments. Segments are the units of program material on xTV. Econodroid will be used to make rough cuts and quality finished segments conveniently and economically.
Econodroid uses two monitors, one for computer interaction, and one for video presentation.
A segment is a collection of music, narration, and images. It is brief, lasting between 30 seconds and 3 minutes. The images are usually still images, in order to take advantage of the still image information bias of optical media.
A finished segment is not a piece of film or videotape. It is a series of videodisc frames, a compressed digital soundtrack, and a playlist which synchronizes the two. It is also a set of companion materials, including a script, teacher's guide, and references to related segments.
The elements of music, narration, and image need to be carefully synchronized. Rhythm and pacing are used to help deliver the message.
Econodroid will provide these services for segment construction:
• A digital light table for organizing images.
• An image-oriented programming language for sequencing the visual elements of a segment.
• A two-channel digital recording facility for capturing soundtrack material.
• A simple digital audio editing capability.
• A digital mixing capability.
• A synchronization capability for conveniently cutting images to music or narration.
• Integration with the production database.
The components of a segment (soundtrack, digital light table, etc.) can be stored under the segment name.
The Econodroid has four main display windows:
Digital Light Table
Audio Editing
Audio Mixing
Synchronization
Digital Light Table
Images are assembled and organized on a Digital Light Table. The Digital Light Table has two pieces, an upper Program Sequence, and a lower Work Table.
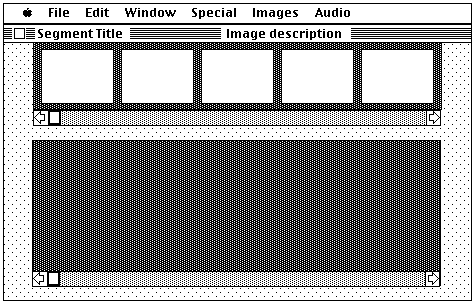
Text on the title bar identifies the segment being constructed, and describes the icon currently selected. The video or graphic which the icon describes is displayed on the video monitor.
Image Icons are placed into the Program Sequence in the order in which they will be displayed in the segment. The Work Table is a space in which the icons can be grouped, sorted, and manipulated.
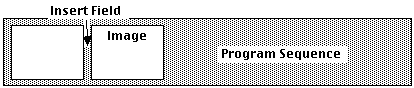
Icons are picked up and moved about in standard Macintosh fashion. They can be placed anywhere in the Work Table, and can even overlap, but can't completely cover each other. In the Program Sequence, the icons are constrained to be more orderly. Attempting to drop an image between two other images will cause an insertion. If an icon is moved out of the Program Sequence, the space is closed up.
The File and Edit pull down menus provide the standard load/save and clipboard functions.
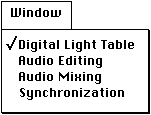
The Window menu provides the means for switching to the other windows within Econodroid.
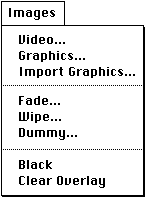
The Images menu is the source of image icons.
Video...
This selection brings up a dialog box which can produce an icon for a frame or for a sequence of frames from the videodisc.
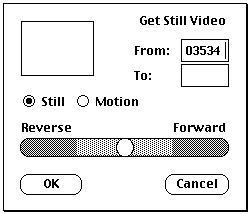
A frame number between 1 and 54000 can be typed in the text entry boxes. If the To: number is left blank, then a single icon is produced. If To: is fill-in, then a number of icons are produced, one for each frame in the range. The To: number must not be less than the From: number. An icon looks like a miniature of the still image it represents.
An alternative to entering a frame number is to search the videodisc with the Disc Search Control. Dragging the dot to the right causes the player to start playing forward. It begins at a slow speed, then gradually increases to a fast forward/scan rate by the time it reaches the rightmost edge. Dragging to the left works the same, only the player goes in the reverse direction. Releasing the dot causes it to jump back to the center, freezing the disc at the current frame.
Clicking on the light shaded area to the dot's right or left causes the disc player to step one frame forward or back. Clicking on the darker shaded region to the dot's right or left causes the player to play at normal speed forward or backwards. Clicking on the dot freezes the player at the current frame.
This dialog box can also be used to specify a running video segment from the videodisc, by clicking on the Motion button:
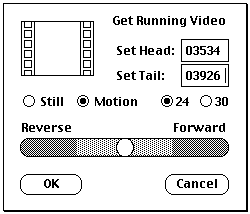
A running video icon is distinguished by a set of sprocket holes. The starting frame number (Head), ending frame number (Tail) and frame rate (24 or 30 frames per second) can be specified. As with stills, the Disc Search Control can be used as an alternative to typing frame numbers.
When OK is clicked, the dialog box is exited. The new icon (or icons if a series of stills is selected) is deposited, selected, on the Work Table. Cancel exits the dialog box with no icons made.
Graphics...
xTV will be able to display Apple IIGS graphics in a segment, and will use an overlay board to superimpose graphics over video material. The material can come from a IIGS via floppy, or be prepared on a Macintosh II with a IIGS-compatible program. The first time a graphic is presented to Econodroid, it must go through the Import Graphics... selection. After that, the Graphics... selection can be used to retrieve graphics from the database.
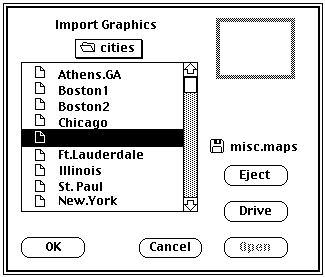
A graphic is imported by identifying its filename using an HFS file selection box. The Econodroid operator is then invited to enter a descriptive name under which the graphics will be filed, and specify whether or not the graphic is an overlay (having a transparent background). The file can contain a static image or multi-frame animation.
This process produces an icon which is deposited and selected on the Work Table. A graphic icon has solid border. An overlay (transparent) icon has a dotted border.
Fade...
xTV can do a fade from video or graphic to black, and from black to a video or graphic. The Fade... selection produces a Fade to black or Fade from black icon.
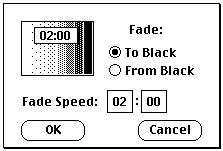
0 to 99 seconds can be entered in the left box. 0 to 29 frames can be entered in the right box. The time entered is displayed in a box in the icon. The Fade to black icon has an eight step gray scale going from white on the left to black on the right. The Fade from black icon has the gray scale going from black to white.
Clicking on the OK capsule creates a fade icon, which is deposited, selected, on the Work Table. Clicking Cancel exits the dialog box without making an icon.
Wipe...
This selection specifies a simple vertical wipe. Wipes can be from video to black, black to video, video to IIGS graphics, IIGS graphics to video, IIGS graphics to IIGS graphics, IIGS graphics to black, and black to IIGS graphics. Hardware limitations prohibit wipes from video to video.
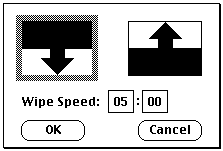
The wipe direction is chosen by clicking on one of the direction icons. The selected icon is highlighted by a colored border around it's outside edge. The white area of the wipe icon represents the image to the left in the Program Sequence. The black area represents the image to the right.
Wipe speed is entered in the two text fields. 0 to 99 seconds can be entered in the left box. 0 to 29 frames can be entered in the right box. The time entered is displayed in the dark portion of the selected icon.
Clicking on the OK capsule creates a wipe icon with the indicated duration.
If a wipe slide is placed in the Program Sequence by itself, or if it is placed between two video images, then it will flash, indicating an incorrect sequence.
Dummy...
It is common to begin editing on segments even before all of the visual material has been collected. Dummy icons take the place of video or graphics which are not yet available.
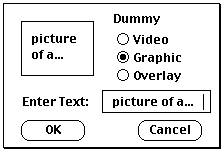
This selection produces a dummy icon, on which a comment can be typed, to hold the place of missing material.
Black
This selection produces a black icon, which stands for video black.
Clear Overlay
This selection produces a Clear Overlay icon, which removes the overlay from the current video or graphic.

Clean up
This selection straightens up the Work Space. It is similar to the Finder's Clean up.
Play
When a video sequence is selected, normally only the first frame is displayed on the video monitor. Selecting Play plays the whole sequence.
Show info
This selection displays database information about the currently selected icon.

The Audio menu allows the Econodroid operator to listen to the soundtrack (assuming it has already been recorded) while working at the Digital Light Table.
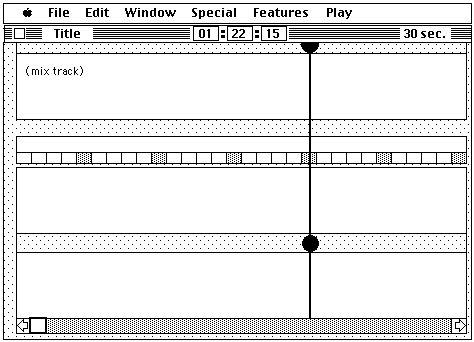
Audio Editing
The Audio Editing window provides recording and editing tools.
Econodroid has two independent digital recording tracks. A typical use would be to keep music in one channel and narration in another, cutting one to fit the other. Digital sound-on-sound mixing is an option.

The features of the Audio Editing screen include
• a menu bar
• a title bar
• a Sound Storage Track
• a Take Bar (see Synchronization)
• two Audio Tracks
• two Audio Heads, one on the Sound Storage Track, and one shared by the two Audio Tracks.
The title bar shows the name of the segment being edited, the time code at the main Audio Head, and the current time scale. The time code can be changed by clicking and typing in a time, by sliding the Audio Tracks with the scroll bar, by dragging (scrubbing) the Audio Head, by advancing to a marker, and by playing the soundtrack. Time code is expressed in minutes:seconds:frames.
The Sound Storage Track provides temporary workspace for sounds. Sounds can be dragged to it, and are inserted as in the Program Sequence. Clicking on a sound in the storage track plays it.
Each of the two main Audio Tracks has a button at the left that can be used to silence the track. This allows the Econodroid operator to concentrate on a single track.
The two Audio Tracks provide a visual interpretation of sounds, shown as exaggerated waveforms. They can be treated as perfect tape, on which you can actually see the sound and splice noiselessly without tape or dangerous razor blades.
The Audio Head is translucent, so that a waveform sample can be seen under it.
Clinking on the intersection of the Head and the Track will cause a cut. (This is a very different sense of cut than is found in the Macintosh interface.) Pieces of cut soundtrack can be dragged left and right. The gap this creates is silent. Sound can be dragged over silence.
Sound can also be dragged to the Sound Storage Track, and sound from the Sound Storage Track can be dragged to a silent portion of the main Audio Track. Pieces of sound can be deleted.
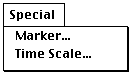
Marker...
A marker provides a way of remembering a particular time code and seeking to it instantly. There are ten markers, each associated with a one digit number.
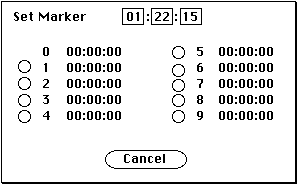
The current time code is displayed. A new time code can be entered. (Doing so does not change the current time code.) Clicking on a button assigns the time code to the number and exits the box. Pressing control-number will set the time code to that remembered value. Control-number can also be used any time a time-code can be entered. Control-0 is always the beginning of the segment (time 0).
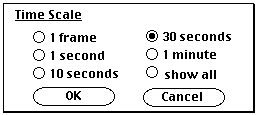
Time Scale...
The width of the screen corresponds to a unit of time. The entire soundtrack can be seen at once (show all), but at that resolution, cutting and editing are very clumsy. There are 5 levels of zoom, which show smaller portions of the soundtrack in greater resolution.

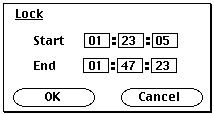
Lock...
Any section of the segment can be locked. This can prevent accidental destruction of finished sections of the take bar or the main audio tracks. Unlock turns off the lock. The locked section will be distinguished by color.
Erase Track...
The unlocked portion of any of the Audio Tracks, the Sound Storage Track, the Mix Control Track, or the Take Bar can be erased.

Record...
Econodroid can record on one track at a time. The source is usually external, but it can be the other track, or a mix of the two tracks. The defaults on the Start time and the In time are the current time code. The default on the Out time is 03:00:00.
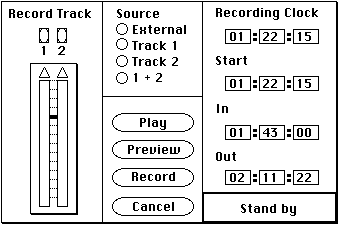
When Record is pressed, the Recording Clock is set to Start and begins ticking. When it equals In, then recording begins. When it equals Out, then recording stops.
Preview is the same as Record, except that recording doesn't actually take place. This permits testing and level setting.
Play plays the recording, starting at the Start time.
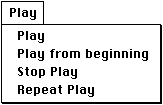
Play
Begin playing the segment from the current time, stopping at the end. While the segment is playing, the Econodroid operator can seize the Audio Head, which stops the play. During play, markers can be used to skip the Audio Head forward or backward.
Play from beginning
Same as Play, except that play begins at the beginning.
Stop Play
Stops playing, leaving the audio head at the point where it last played.
Repeat Play
Same as Play, except instead of stopping at the end, it starts over.
Audio Mixing
The Audio Mixing window is the same as the Audio Editing window, except that the audio silence switches are removed, and the Sound Storage Track is replaced by a Mixing Control Track. A single Audio Head sweeps all three tracks.
The Mix Control Track controls the playback levels of the two Audio Tracks. Those levels are allowed to change over time. This can be used to reduce the volume on the music when the narrator is speaking.

The operator can put indications in the Mix Control Track of the volume for each track. The vertical dimension is volume, the higher the indication, the higher the volume. The horizontal dimension is time, in the same scale as the audio tracks. The system will draw splines through the indications, and use the resulting curves to control the amplitudes of the tracks during playback.

Indications are recorded by clicking on the Mix Control Track. The indication will be 1 or 2, depending on which Audio Track was last clicked on. They can be dragged around. They are deleted when dragged out of the Mix Control Track.
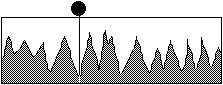
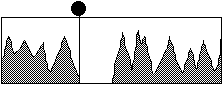
Synchronization
The Synchronization Window is used to synchronize images with sound. The screen contains the two Audio Tracks from the Audio Editing window, and the Program Sequence from the Digital Light Table. The Program Sequence in this window has no scroll bar. Scrolling of images is synchronized to the Take Bar and the Audio Head. The second frame is highlighted to indicate the image displayed at the current time code. The center frame previews the next image. The first frame shows the previous image. Images move right-to-left over time, as the segment advances.
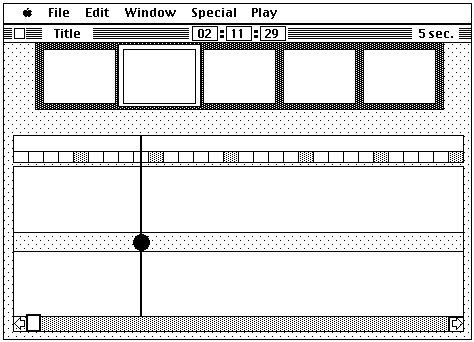
Clicking on an image icon in the Program Sequence will bring up an information box about the icon. Some of the fields (frame number, fade time, etc.) can be modified.
The Take Bar is used to associate image icons with times. Pressing the Space Bar puts a Take Pulse on the Take Bar at the current time code. This can even be done while the soundtrack is playing. Pressing Space Bar when there is already a Take pulse at that time creates a Double Take Pulse. Take Pulses can be adjusted by dragging them left or right. They can be deleted by dragging them out of the Take Bar.

As the segment plays, whenever the Head crosses a Take Pulse, the image icons in the Program Sequence shift left, and the action indicated by the new current image is performed. When the Head crosses a Double Take Pulse, then two icons are scrolled, and their actions are both performed at that time.
The action performed depends on the image icon. A still icon causes the videodisc to display the indicated frame. A graphic icon causes a computer generated image to be displayed. An overlay icon causes an overlay to be displayed. A clear overlay icon causes the overlay to be removed.
Some icons have time components, and so have a Take Pulse and an implied End Pulse. These time icons include Moving Video, Graphics Animation, Wipes, and Fades. The Take Pulse for a time icon looks like this:

Dragging the End Pulse will modify the Tail Frame or the fade or wipe time to conform to the time shown between the pulses. If the time icon is Motion Video, then a new video icon cannot be displayed before the End Pulse. Similarly, if the time icon is for Animation, then a new graphic or overlay cannot be displayed before the End Pulse. A new fade or wipe cannot begin until the current fade or wipe has completed.
Pre-Pre-Mastering
There are many technical production steps in creating an optical disc. Everyone calls his step "mastering", and the previous guy's step "pre-mastering".
xTV requires the production of two optical discs, a videodisc, and a CD-ROM. The videodisc requires a pre-master videotape. The CD-ROM requires a pre-master data tape.
There must be some important manipulations to the xTV database prior to creating a pre-master tape. These steps will be performed by the xTV Pre-Pre-Mastering program. Each step is a subprogram, requiring no intervention (except for mechanical intervention, like changing a tape). The subprograms are run in this sequence:
1) Audio compression. The soundtracks will be compressed. The specific technique has not been determined yet. CD-I has an "FM Quality mode" which yields a 4 to 1 reduction relative to CD audio with no noticeable degradation or artifacts (in at least some demonstrations). We need a scheme which is at least as good as that.
2) Make a map of the videodisc. Traverse the segment playlists, and make a new list of frame numbers, translating the random ordering of the working collection into an sequence which makes the frames within a segment contiguous. This list will be used in some of the following steps.
3) Create from the frame translation list a disk containing the video editing commands to automatically create a new one-inch video pre-master tape. The disk will then be taken to a post-production house. The xTV Production system will not be equipped with a 1" VCR capable of recording single frames without pre-roll.
4) Revise the frame numbers in the segment playlists using the frame translation list. Convert the playlists to the Workshop format.
5) Create a postage stamp-sized facsimile of each still, video sequence, graphic, overlay, and segment. The xTV Workshop will use these miniatures in playlists.
6) Compile indexes. Because searching speeds on a CD-ROM can be abominable, we will need to create indexes to the database. This is particularly true for enabling semi-quick keyword searches. Keywords and other organizing tools will already be in the database.
7) Make a tape for CD-ROM mastering. Up to 500 Mbytes will be written to a series of magnetic tapes for delivery to a CD-ROM mastering facility. The database will conform to the High Sierra file system standard.
Simulation
It must be possible to test the Pre-Master results prior to going to the time and expense of creating CD-ROM and videodisc masters. The Production System, attached to an Apple IIGS, will simulate the product discs. The IIGS will be running modified Workshop software which substitutes the two disc players and frame buffer for the videodisc player, and the huge disk for the CD-ROM. The Production System will try to match response times as closely as possible.
In this way, there can be a high level of confidence that the discs will work.